Lesson 1: The Valve Controller Project
This tutorial provides a step-by-step introduction on how to build software in Coco, using Popili in VS Code or Eclipse. To use Popili, you will need a valid licence.
As a running example, the tutorial uses a simple software component that operates a valve actuator, starting with a simple implementation in the first lesson, and incrementally extending it with more functionality as the tutorial progresses. Although this example is conceptually simple in the sense that a valve is either open or closed, it highlights some of the challenges arising in developing asynchronous systems, and how Popili supports developers in solving them.
Lesson 1 introduces the software to be developed, in terms of its functional requirements and architecture, and introduces the following topics required to get started:
- Creating a new Coco project, and new Coco module.
- Building simple port and component declarations.
- Formally verifying ports and components, and understanding the results.
- Generating the corresponding code in C++.
Whilst we recommend that you try to build the examples yourself, you can
download the complete set of example files. To import them into VS Code or
Eclipse, store the unzipped downloaded folder (called coco_examples) in your chosen directory, and follow the relevant
steps below.
For VS Code: Open the downloaded folder called coco_examples, and you should be able to use
Popili in the usual way:
For Eclipse:
- Select File → Open Projects from File System.
- In the dialog that opens, click Directory, and select the
coco_examplesdirectory where you unzipped the example files. - Ensure that Search for nested projects is ticked.
- Ensure that Detect and configure project natures is ticked.
- Click on the Finish button.
Warning
On more recent versions of Eclipse, the steps described above will import all the example projects into a top-level folder called coco_examples. Opening the folder reveals all of the individual Coco projects.
On some older versions of Eclipse, all the Coco projects are imported as top-level project folders, and should be used instead of the coco_examples folder and its subfolders, which can be deleted.
Software requirements
The objective of this tutorial is to build a software component that can be used by a control systems application for operating a valve actuator. The component has the following functional requirements:
| R1: | The valve controller must enable clients to open and close the valve. |
|---|---|
| R2: | The valve controller must enable clients to query the valve position. |
| R3: | The valve controller must be suitable for use by control systems. This means that all function calls on it must be non-blocking, and the valve controller shall always remain responsive to client requests. |
| R4: | The valve controller must support different valve types, including fast action solenoid operated valves, and slower motor driven valves that can take several minutes to complete the movement instruction. |
| R5: | The valve controller must not be dependent on hardware connections, or details of the hardware/software interface. |
| R6: | The valve controller must indicate whether or not the client’s instructions have been successfully carried out. |
We will follow an incremental software development approach to build this component, starting with the simple good weather behaviour, and then adding functionality to satisfy the requirements as the tutorial progresses.
Introducing the Coco Workflow
A fundamental building block in Coco is the concept of a component that describes a system or sub-system, and has defined interfaces with its environment. A component interacts with its environment by sending and receiving events across these interfaces via ports, where an event is either a synchronous function call or an asynchronous signal. Further, a component describes how these interactions are implemented in sufficient detail such that Popili can automatically generate the code, for example in C++. In contrast, a port describes the visible events that a component can perform with other components across a specific boundary. These events are either functions that the component implements or signals that it emits, which other components in the system can call or receive respectively. In addition to defining the interfaces, a port can also specify what sequences of function calls and signals are allowed across a component boundary. This only includes the events that are visible across the port and omitting any implementation details. A port declaration acts as a behavioural specification to the component implementing the port, and those using it.
This tutorial follows the normal workflow for developing software in Coco. The first step is to identify the scope of the software that will be developed using Coco, and define the software architecture in terms of components and ports. This includes identifying all other parts of the system that are outside of the scope of the software being developed, but that nonetheless interact with it. Coco provides an elegant way of modelling these as external components, and capturing the assumptions about the interactions between them and the software being developed. An example of this is provided in this tutorial.
Defining the Architecture
The valve controller project is broken down into three simple software components, as illustrated in the following architecture diagram.
The provided port of each component is annotated with a label of the form x : X, where X is the port declaration, and x is an instance of X.
The topmost component called Application is a client of the valve controller component, and can therefore make calls on and receive signals from the valve controller. This component is outside the scope of this tutorial, but is included in the architecture to highlight the fact that there would typically be an application layer that uses the valve controller software being developed in this tutorial.
The component called ValveControllerImpl is the one being developed in this tutorial. It implements all of the hardware-independent logic, and provides all of the functions to the application layer. The partitioning of the software into the ValveControllerImpl and ValveHALBase components is designed to meet the requirement R4 and R5 above.
Finally, the component called ValveHALBase implements the hardware abstraction layer, which is responsible for abstracting away all of the hardware/software interface details about how the valve is connected and processes commands. Its implementation is written directly in C++, and is the minimum code needed to provide an interface to the hardware which is callable by a Coco component. We will see how Coco handles code developed in other languages, which interacts with the software being developed in Coco.
The components are connected together via ports as illustrated in the architecture diagram above. For example, the ValveControllerImpl component has a provided port called client (which is an instance of the port ValveController). This port specifies the functions and signals provided by this component to its clients. In contrast, ValveControllerImpl also has a required port called hal, which specifies the functions and signals implemented by the ValveHALBase component, and which ValveControllerImpl uses. These connections are declared in an encapsulating component and automatically established at runtime by the generated code.
Building Ports and Components
The next step is to start developing the ports and components defined in the software architecture above. Using the valve controller component as an example, the recommended steps for building this component are as follows:
- Identify the functions and signals that the valve controller component has to implement, and provide to other components in its environment.
- Define a port with these function and signal declarations, together with a precise description of how the valve controller component must behave across this port boundary. This port will become the provided port of the valve controller component, which it will have to implement.
- Identify the other components in the system that will be used by the valve controller component. In this case, there is only one, namely the HAL component. Follow steps 1 and 2 to define a port for the HAL, which describes the interactions between the HAL and its client (i.e. the valve controller). This port will become the provided port for the HAL, which it has to implement correctly, and the required port for the valve controller.
- Build the implementation of the valve controller as a Coco component.
- Make small incremental steps, and run the verification frequently. This is referred to as a verification-driven development approach, and supports developers by making full use of the automated verification to find all of the errors for them as they build their software.
- When all of the components are implemented and verify correctly, generate the corresponding C++ code.
Step 1: Creating a Coco Project
Create a new project called ValveProject by following the steps below for VS Code or Eclipse.
Steps for VS Code
Open the Command Palette (Ctrl+Shift+P on Linux and Windows, and Cmd+Shift+P on MacOS), and search for Popili : New Project :

Complete the steps for creating a new project:
- Create a new folder called ValveProject, and then click on Create Project.
- Select C++ as your target language from the dropdown list.
- Select the package name. By default, Popili will propose your project (folder) name.
- Select the default name src as your source file location for your Coco modules.
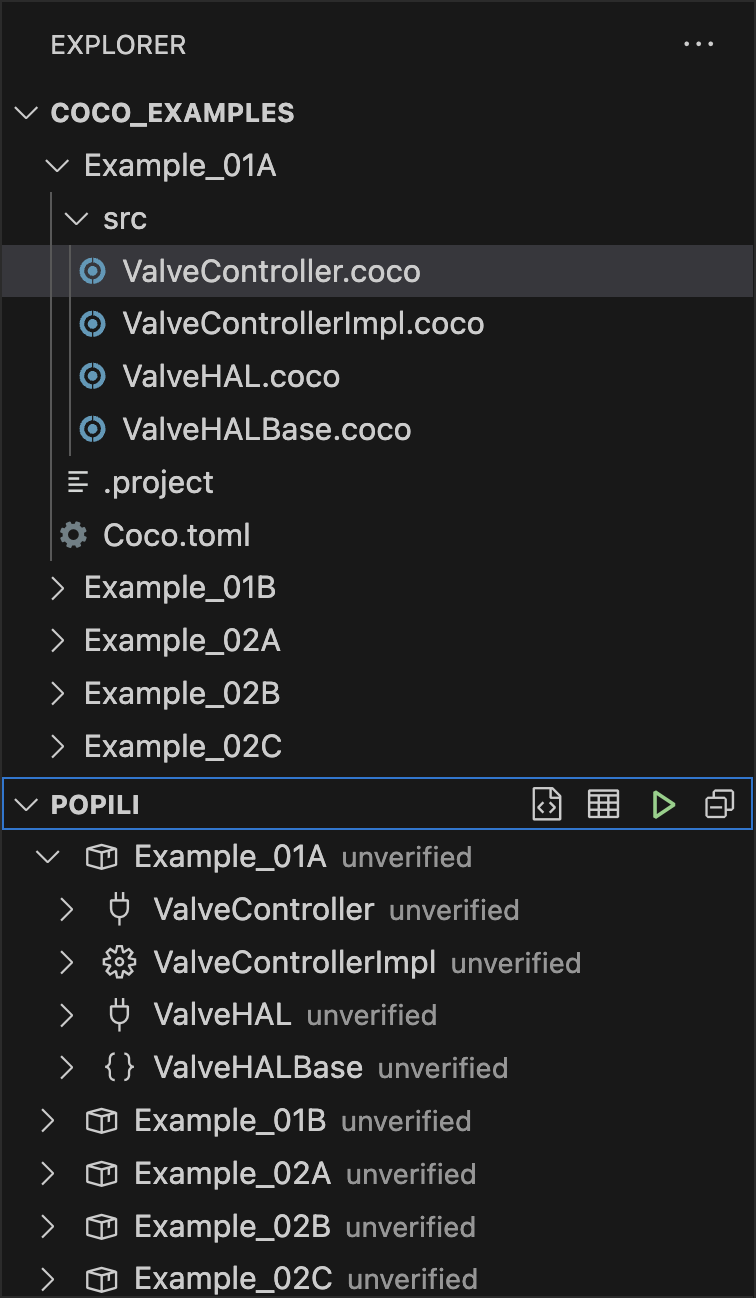
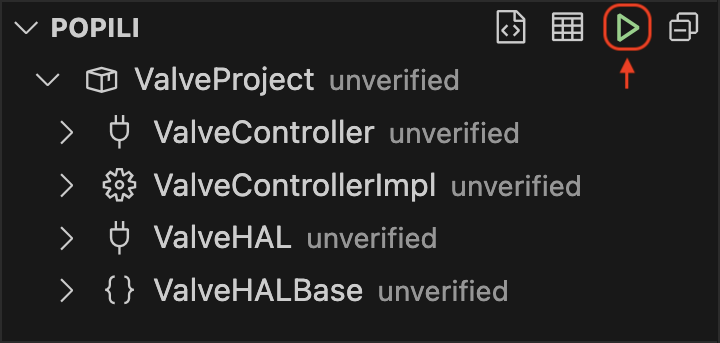
Upon completion, your Coco project will appear in the Explorer view as follows:
Steps for Eclipse
Select File → New → Coco Project. If this is not available, then select File → New → Other…, click on the Coco dropdown menu, and select Coco Project. The following window should appear:
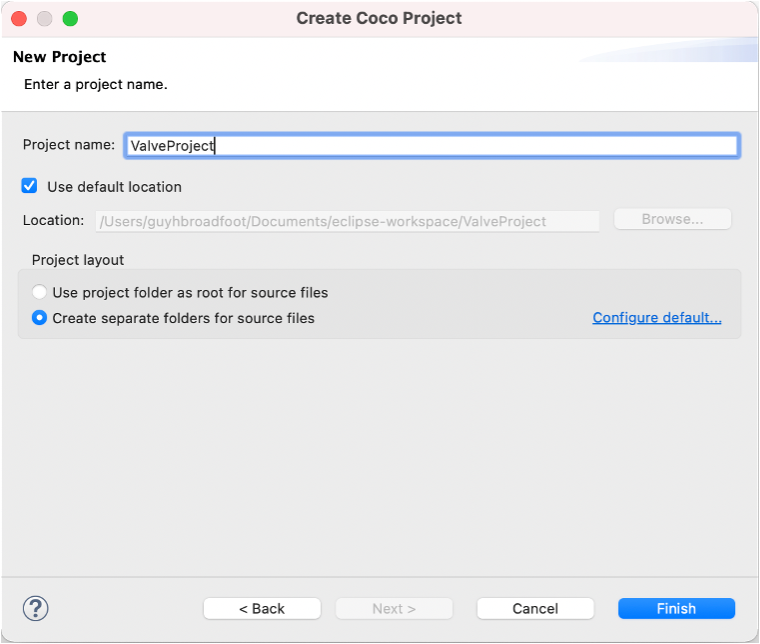
Complete the project dialog illustrated above as follows:
- Enter a project name, for example, ValveProject.
- Select Use default location, if not already selected by default.
- Select Create separate folders for source files, if not already selected. By default, a folder named src is created and all Coco source files must be created in this folder. All of the tutorial examples use this structure. If you prefer to have all Coco source files in your projects to be in the project folder itself and not in a subfolder, select Use project folder as root for source files instead.
- Click on the Finish button.
Step 2: Building a Port for the Valve Controller
A port defines the interfaces implemented by a component on a specific boundary, and is analogous to an
abstract class in C++ or an interface in Java. It can also specify the ordering in which all interactions across
the port can occur. These interactions are either function calls made on the port by other components in the system, or
signals sent by the port to its environment. A port only specifies the interactions that are visible across the
component boundary, and omits any implementation details. As a result, the behaviour of a port is often
nondeterministic. This tutorial will introduce the different ways that nondeterminism can arise in ports as the lessons
progress. Further details about the syntax and semantics of ports can be found in the sections Ports and
State Machines of the Coco Language Reference.
This section goes through the steps of building your first simple port for the valve controller in Coco, starting with the creation of a new Coco module.
Creating a new Coco Module
Create a new module called ValveController in ValveProject by following the steps below for VS Code or Eclipse.
Steps for VS Code
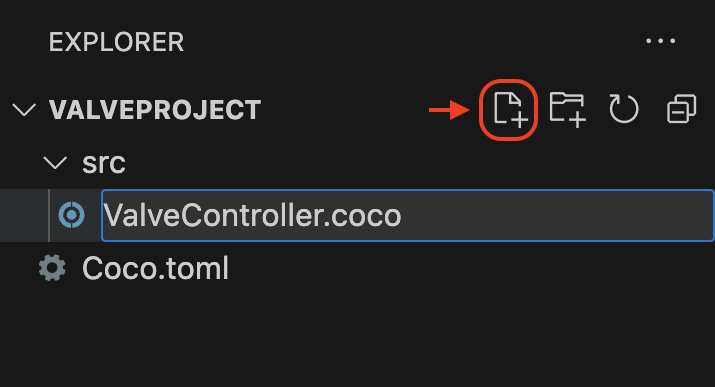
- Open your ValveProject folder, and select the src subfolder, where your coco modules will be stored.
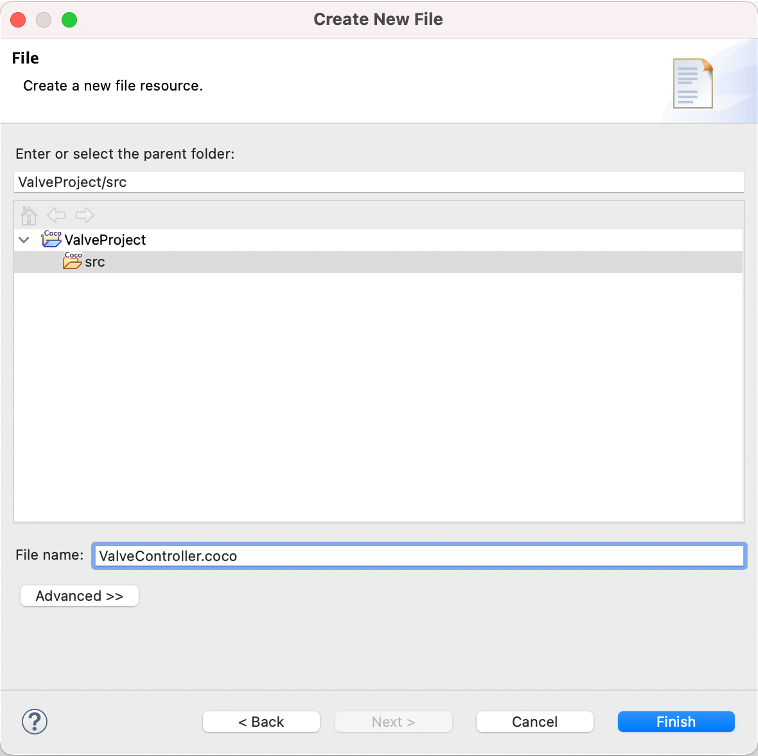
- Click on the New File icon (highlighted below), and enter ValveController.coco as the name of your new module:
Steps for Eclipse
- Select the ValveProject project, and select the src subfolder, where your coco modules will be stored.
- Select File → New → Coco Module, and complete the dialog box by entering ValveController.coco as the new module name and clicking Finish:
Your new module will appear in the project explorer window under the ValveProject folder. You may need to expand the project folder to see your new Coco module.
Declaring a Port
To declare a port for the valve controller, add the following lines to the newly created ValveController module:
port ValveController {
}
This declares a port called ValveController, the body of which will be declared inside the braces.
Note
The Coco editor automatically formats your code as you type. For Eclipse, you can request a complete reformat of the file at any time by using the keyboard shortcut Shift+Command+F on macOS, or Shift+Ctrl+F on Windows and Linux. Depending on your Coco preferences, the file is automatically reformatted each time it is saved.
Declaring Function Interfaces
This simple port will start with four function interface declarations to initialise, open,
and close a valve. To declare these new functions, add the following declarations in the body of ValveController:
None of the functions have parameters, and they all return Nil, which is analogous to void in C++.
Specifying Behaviour
In addition to declaring functions and signals, a port can also specify the ordering in which all interactions across
the port can occur. This behaviour is specified by declaring a state machine in the port declaration.
Port state machines are often nondeterministic as they only specify a partial view of how a component interacts on a
given boundary, in terms of the events that are visible across that boundary, and omits any of the implementation
details.
A provided port of some component C essentially acts as a contractual specification for how C will behave
with respect to other components that use it. For example ValveController is the provided port of the ValveControllerImpl
component, and will therefore specify how the ValveControllerImpl component will interact with the software application
layer that uses it ValveController also acts as a specification for the ValveControllerImpl component, and Popili
will formally verify whether ValveControllerImpl correctly implements ValveController. This will be discussed further in this
lesson when all of the ports and components are verified by Popili.
To add the port behaviour to ValveController, extend your port by adding the following state machine declaration after the
function interface declarations:
  machine {
  }
Note
Every state machine has two built-in event states called Main and
Terminated. The state Main is the ancestor of all user-defined states. All declarations
in a state machine that are not within a user-defined state are declarations in Main. The state Terminated denotes
the termination of a state machine. No declarations can be added to this state, and all incoming events are illegal.
This means that a transition to Terminated is the final action of a state machine, and it cannot be restarted from
this state.
Coco supports automatic termination of systems. In the generated code, each component stores the number of clients
connected to any of its provided ports. When this reaches zero, a call on unused() is initiated on the component
resulting in a call on setNextState(Terminated), thereby automatically shutting down the component. Termination cascades
through the system from top to bottom. For further details, see Termination in the
Coco Language Reference. This topic will also be explored later on in Lesson 7.
Upon startup, the state machine will enter an initial state, which is the first user-defined state in the state
machine. If the state machine has no user-defined states, then the initial state is Main. This startup behaviour can
be overridden by declaring an entry function in Main that calls the state transition function
setNextState passing the desired initial state as the parameter. Examples of this will be illustrated
later on in the tutorial.
The example state machine above is empty, and therefore its initial state is Main. Although it does not
have any transitions declared, it is still a valid state machine, and specifies that no functions are allowed to be called
of ValveController.
The next step is to declare a new event state, called Initial, as follows:
  machine {
    state Initial {
      setup() = setNextState(Operational)
    }
  }
Initial is the initial state of this state machine, as it is the first (and only) user-defined state. It has a single
event transition, which says that when setup() is called, the state machine will transition to a state called Operational. The action
setNextState(Operational) is a call to the built-in function setNextState(…) passing Operational as
its parameter to specify the state to which that the state machine will change completing the transition.
Initial does not declare transitions for any of the other functions in ValveController, which means that a component
requiring this port is not permitted to call these other functions while the port is in this state.
Note
For an incoming event (i.e. function or signal) in a port or component state machine, if there is a matching
enabled transition, then its handler gets executed. In a port state machine, there can be
multiple enabled transitions for a given event, in which case one of them is chosen nondeterministically.
If the handler is illegal, then it means that this event is not allowed in the given state. If no such
matching enabled transition exists, then the illegal handler is executed by default. For example, the following
two ports are equivalent:
In both example ports above, the function stop() results in the illegal handler being executed. In
this case, we say that the function stop() is illegal. The same applies to incoming signals in component state
machines. As we will see later on, verification checks whether components and ports agree when function calls and
incoming signals are illegal.
The Coco editor will show a static error in your current version of ValveController, because Operational has not
been declared yet. This error will disappear once this state has been added as follows:
  machine {
    state Initial {
      setup() = setNextState(Operational)
    }
    state Operational {
      open() = {}
      close() = {}
    }
  }
In Operational, the functions open() and close() can be repeatedly called, and in both cases the state machine will
simply remain in the same state.
Note
The opening and closing movements are specified in ValveController as synchronous actions, namely when the function open() or
close() returns to the calling client, the valve movement has finished. Consequently, the client is blocked, and
unresponsive while the valve is moving and this specification fails to meet R3.
The complete Coco for this port declaration is in Example_01A/src/ValveController.coco.
Step 3: Modelling the Hardware Abstraction Layer
In this tutorial, we use a hardware abstraction layer (HAL) as the interfacing code between the valve controller software being implemented, and the physical hardware itself. The implementation of the HAL falls outside of the scope of what is being developed in Coco, and is implemented directly in C++. However, it interacts with the valve controller being developed in Coco, and is therefore specified as an external component.
Note
An external component in Coco is one that describes some part of the system that is not implemented in
Coco, but that nonetheless interacts with the Coco components being developed. They are used to capture the
assumptions of how the external environment interacts with Coco components for the purposes of verification, and to
support the integration of the generated code into existing code that was developed manually or
using other tools.
The first step towards building an external component of the HAL implementation is to specify its provided port, which describes how it interacts with the valve controller software being developed in Coco. For this tutorial, we use a very simple HAL abstraction.
Declaring a HAL Port
Create a new module called ValveHAL, and add the following port declaration:
port ValveHAL {
  enum Moves {
    case Open
    case Close
  }
}
ValveHAL declares an enum called Moves with named values Open and Close, which will be used
to indicate which way the valve should be moved. It is declared locally within the ValveHAL port, and
references to it will have to be qualified by the port name.
Note
Modules, ports and components are all namespaces. It is common to declare entities that form part of a
component’s interface within the namespace of its provided port. The enum called Moves is part of the interface
to any component implementing ValveHAL as its provided port.
Add the following function interface declaration:
function move(target : Moves) : Nil
This function takes a parameter of type Moves to indicate which way the valve is being requested to
move.
Complete ValveHAL by adding the following state machine declaration:
port ValveHAL {
  enum Moves {
    case Open
    case Close
  }
  function move(target : Moves) : Nil

  machine {
    move(_) = {}
  }
}
This port is stateless, and allows move(Open) or move(Close) to be repeatedly called by its client to open or
close the valve respectively. In this example, its client will be the valve controller software being developed in this
tutorial.
Note the following line in the state machine:
move(_) = {}
The argument passed to the function move is not used, and therefore the wildcard _ can be used in this context
instead. The complete Coco for this port declaration is in Example_01A/src/ValveHAL.coco.
Declaring an external component for the HAL
Create a new module called ValveHALBase, and add the following external component declaration:
The external component ValveHALBase has a provided port called client, which is an instance of the port ValveHAL
declared above. This component will be used when code is generated for the other Coco components being implemented.
Note
Each module has its own namespace, so a single name may be used in several different modules, with a distinct meaning in each. In order to use a name declared in another module, the module must be imported.
A module can either be imported with a different name using the as keyword followed by a new module name, or
it can be imported unqualified, using the keyword unqualified, as illustrated in the example of ValveHALBase
above. In this case, names declared in the imported module may be used unqualified in the current module.
The complete Coco for this external component declaration is in Example_01A/src/ValveHALBase.coco.
Step 4: Building a Component for the Valve Controller
You should now have the following three modules:
- ValveController containing the port declaration
ValveController; - ValveHAL containing the port declaration
ValveHAL; and - ValveHALBase containing the external component declaration
ValveHALBase.
The next step is to build the implementation of the valve controller software in Coco. This will be achieved by
declaring an implementaton component, called ValveControllerImpl, which specifies a
complete description of the functionality of a component from which runtime code is generated.
Note
An implementaton component describes the complete behaviour of a component in terms of the functions and signals declared on its provided port, and the functions and signals it can call and receive respectively on its required ports. It must implement the functions and signals in accordance with its provided port specification, and may call any of the functions on its required ports. It must also be able to handle all of the signals that it can receive from its required ports. An implementation component is sufficiently detailed that the corresponding runtime code can be automatically generated from it.
As illustrated in the architecture diagram at the start of this lesson, the component ValveControllerImpl has a provided
port of type ValveController and a required port of type ValveHAL, both of which have been declared above.
Create a new module called ValveControllerImpl, and add the following lines to import the port declarations for ValveController
and ValveHAL from their respective modules:
import unqualified ValveController
import unqualified ValveHAL
Declare a new component called ValveControllerImpl by adding the following lines:
@runtime(.MultiThreaded)
component ValveControllerImpl {
}
A component declaration is analogous to a class in Java or C++.
Add the following field declarations to specify the provided and required port instances:
The first field means that this component provides a port instance client of type ValveController to
all other components in the system that use this component. The example provided in the architecture diagram at the
start of this tutorial is a software application layer represented by the Application component. The second field
specifies that the component requires access to some component instance that provides a port of
type ValveHAL, and declares a local instance of it called hal.
Add the following state machine declaration to specify the component’s behaviour:
  machine {
    state Initial {
      client.setup() = setNextState(Unknown)
    }

    // Valve position unknown until the first move request is received
    state Unknown {
      client.open() = {
        hal.move(.Open);
        setNextState(Opened);
      }
      client.close() = {
        hal.move(.Close);
        setNextState(Closed);
      }
    }

    state Opened {
      client.close() = {
        hal.move(.Close);
        setNextState(Closed);
      }
    }

    state Closed {
      client.open() = {
        hal.move(.Open);
        setNextState(Opened);
      }
    }
  }
The events in a component state machine must be qualified by the event source from which they
originate. All events originating from the provided port are qualified with the instance name client, for
example, client.setup(). Likewise, all events on the required port are qualified with the instance name
hal, for example, hal.move(.Open).
This simple component state machine illustrates how ValveControllerImpl responds to some of the incoming function calls
made on its provided port by calling functions on its required port. For example, in state Opened, when it receives a
call on client.close(), ValveControllerImpl will call hal.move(.Close) on its required port, and
transition to the state Closed.
Note
Coco supports implicit member expressions, which is an abbreviated way of accessing a member of a type,
without having to explicitly specify the type. This can be used in contexts where the type can be automatically inferred.
In the example state machine above, implicit members are used when calling move(.Open) and
move(.Close) on the required port hal. We will see other examples throughout the tutorial.
The complete Coco for this component declaration is in Example_01A/src/ValveControllerImpl.coco.
Note
Component state machines differ from port state machines in a number of ways. Firstly, a component state machine must
be complete and deterministic. This means that for every possible incoming event, there must be precisely one enabled
matching event transition. If no such transition is specified, then the event is defined to be
illegal by default. Incoming events can either be function calls made via its provided port, or signals sent to the
component by one of its required ports. Secondly, component state machines cannot have
spontaneous transitions, as these are abstractions used only in ports to
model the consequences of
actions that are invisible across a component boundary. Finally, component state machines can implement
timer transitions, as will be illustrated later on in the tutorial.
For further details on port and component state machines, see the State Machines section in the Coco Language Reference. This is an ideal point in the tutorial to read through this section!
Step 5: Simulating your Ports and Components
The Coco simulator allows you to interactively explore your port and component state machines, where you can choose which event should be performed at each step. Not only is this very helpful when learning Coco, experienced Coco users also find it beneficial for exploring and understanding complex state machines that they or others have written.
Note
At this point, go to Simulator for Coco (for VS Code) or Simulator for Coco (for Eclipse)
for a quick overview of the menus in the Simulator view, so that you can start exploring your ValveControllerImpl
component.
Once you have read the overview, follow the steps below either for VS Code or Eclipse.
Steps for VS Code
To launch the simulator, either: i) hover over the ValveControllerImpl component assertion in the
Assertions view, and click on the Launch Simulator button that appears on the right of it, or ii) click on Simulate
in the code lens immediately above the component state machine declaration.
Follow these steps to explore your component’s state machine behaviour:
- Get started by clicking on the Continue button (F5) in the VSCode debug toolbar. This will cause the event selector to appear in the Command Palette with a list of events you can select.
- Select
open(). - Execute your selected event by clicking on Continue .
- As you will see, it is illegal to call
open()in theInitialstate. - At any point in the simulation, you can roll back the simulation to an earlier state in your sequence diagram,
and explore alternative scenarios. Hover your curser over the first state on the swim lane for
ValveControllerImpl: a tooltip giving information about the execution state at this point of the simulation will appear. Click on the button at the top of this tooltip. This will cause the simulator to roll back to this point in your simulation. - Select
setup(), and execute it by clicking on Continue . The only next event that can be performed is thereturn nilevent. Select and execute this event too. - Explore several different scenarios that can be executed by your component’s state machine to familiarise yourself with the simulator.
- When you have finished familiarising yourself with the simulator, close the current simulation by clicking on the Stop button in the debug toolbar or by closing the VSCode tab containing the diagram.
Steps for Eclipse
To launch the simulator, right-click on your ValveControllerImpl component declaration in the
Assertions view, and select  Simulate in the popup menu. This will launch the simulator in the top
pane of the Simulator view.
Simulate in the popup menu. This will launch the simulator in the top
pane of the Simulator view.
Follow these steps to explore your component’s state machine behaviour:
- Get started by clicking on the step button
 . This will cause the event selector popup menu
(
. This will cause the event selector popup menu
( ) to appear with a list of events you can select.
 - Select
open(). It should appear in blue in the sequence diagram. - Execute your selected event by clicking on one of the step buttons, for example .
- As you will see, it is illegal to call
open()in theInitialstate. - At any point in the simulation, you can roll back the simulation to an earlier state in your sequence diagram,
and explore alternative scenarios. Hover your cursor over the first state on the swim lane for
ValveControllerImpl, and click on the roll back icon that appears next to the state. This will cause the simulator to roll
back to this point in your simulation.
that appears next to the state. This will cause the simulator to roll
back to this point in your simulation. - Select
setup(), and execute it by clicking. The only next event that can be performed is the
return nilevent. Select and execute this event too. - Explore several different scenarios that can be executed by your component’s state machine to familiarise yourself with the simulator.
- When you have finished familiarising yourself with the simulator, close the current simulation by clicking on
 in the menu at the top of the Simulator view.
Step 6: Verifying your Ports and Components
Popili formally verifies Coco components and ports for a broad range of properties, ranging from runtime errors through to advanced liveness properties. When verifying the correctness of a Coco port, Popili verifies whether the port state machine is well-formed, usable, and implements the base port correctly in the case that it inherits a base port. A Coco component is verified within the context of its environment, namely the required ports that it is connected to, and the specified runtime. When verifying the correctness of a Coco component, Popili checks that the component state machine is well-formed, and that it implements its provided port correctly.
Note
For details about the properties that are formally verified for ports and components, together with examples of how the errors are represented as graphical counterexamples, see the Verification section in the Coco Language Reference. This is an ideal point in the tutorial to read through this section!
Now that you have built your initial set of components and ports, you can formally verify them automatically in Popili. Follow the steps below for either VS Code or Eclipse.
Steps for VS Code
The list of checks that will be verified by Popili are listed in the Assertions view:
You can either select an individual assertion to be verified, or click on the Verify All button (denoted by ) in the top menu of the Assertions window. When an assertion is verified, it will lead to one of the following results:
- The assertion successfully satisfies the property being verified, which is denoted by .
- The assertion has failed the verification, which is denoted by . This means that the port or component being verified does not satisfy the property being checked.
- The verification has raised a warning, which is denoted by . This means that the assertion has failed the verification, but this does not necessarily imply that it is an error in the port or component. For example, a failure to satisfy properties such as the reachability of states and transitions are denoted as warnings instead of errors, as this may well reflect the intention of the port or component specification. Depending on the nature of the warning, when you hover over the assertion you will be able to click either on to see a visual counterexample, or to see a summary table of reachable/unreachable states and transitions.
- The assertion is dependent on an assertion that has failed, and therefore has not been verified, which is denoted by .
See Run the Verification for a summary of possible verification results and their corresponding icons.
Steps for Eclipse
The list of checks that will be verified by Popili are listed in the Assertions view. You can either select an
individual assertion to be verified, or verify all of them using the Run All icon (denoted by  )
in the top menu of the Assertions window. When an assertion is verified, it will lead to one of the following results:
)
in the top menu of the Assertions window. When an assertion is verified, it will lead to one of the following results:
- The assertion successfully satisfies the property being verified, which is denoted by
 .
. - The assertion has failed the verification, which is denoted by
 . This means that the port
or component being verified does not satisfy the property being checked. Users can double-click on the failed assertion
to get a graphical counterexample of the error found.
. This means that the port
or component being verified does not satisfy the property being checked. Users can double-click on the failed assertion
to get a graphical counterexample of the error found. - The verification has raised a warning, which is denoted by
 . This means that the assertion has failed the
verification, but this does not necessarily imply that it is an error in the port or component. For example, a failure to
satisfy properties such as the reachability of states and transitions are denoted as warnings instead of errors, as this
may well reflect the intention of the port or component specification. Users can double-click on an assertion that failed
with a warning to get feedback on the error found. This will either be in the form of a graphical
counterexample, or a textual summary.
. This means that the assertion has failed the
verification, but this does not necessarily imply that it is an error in the port or component. For example, a failure to
satisfy properties such as the reachability of states and transitions are denoted as warnings instead of errors, as this
may well reflect the intention of the port or component specification. Users can double-click on an assertion that failed
with a warning to get feedback on the error found. This will either be in the form of a graphical
counterexample, or a textual summary. - The assertion is dependent on an assertion that has failed, and therefore has not been verified. This is denoted by
 .
.
See Running the Verification for a summary of possible verification results and their corresponding icons.
Note
Developers are encouraged to follow a verification-driven development approach when building software in Coco, where the verification is run frequently as they build their software. This means that errors are found quickly and early, which typically makes them easier and faster to fix. This approach also works very well alongside an incremental development approach, which is commonly followed by developers using Coco.
Verification Results (Example_01A)
When verifying this project, the assertion that checks whether ValveControllerImpl implements its
provided port correctly fails with the following counterexample:
The counterexample displays a sequence diagram, describing (one of) the shortest sequences of interactions that led to the assertion being violated. The sequence diagram consists of swim lanes, one for each component or port involved in the counterexample, and some additional ones depending on the type of assertion that failed.
In this counterexample, there is a swim lane for the component ValveControllerImpl, its required port
hal, its provided port client, and then an additional one labelled User, which represents an external user
invoking all possible calls allowed by the component.
This counterexample illustrates how ValveControllerImpl can reach a state where the function open() is illegal,
whereas its provided port specifies that it must be allowed.
Using the additional debugging information below the sequence diagram, we can see that following a call on setup() and
open(), ValveControllerImpl is in the state Opened:
    state Opened {
      client.close() = {
        hal.move(.Close);
        setNextState(Closed);
      }
    }
In this state, there is no transition for open(), which means that it is illegal.
In contrast, after the same sequence of calls on setup() and open(), its provided port ValveController specifies
open() must be allowed.
Note
You can launch the simulator with a counterexample generated by the verification, which allows you to explore alternative scenarios. One way of doing this (in VS Code and Eclipse) is to hover directly over one of the swim lane labels, and click on the launch simulator icon that appears next to it.
Step 7: Fixing your Code
To fix this verification error found above, we have to extend the ValveControllerImpl component
so that it is able to handle open() when it is already open. Similarly, we also need to make sure that it can also
handle close() when it is closed. Extend your Opened and Closed states as follows:
    state Opened {
      client.open() = {}
      client.close() = {
        hal.move(.Close);
        setNextState(Closed);
      }
    }

    state Closed {
      client.open() = {
        hal.move(.Open);
        setNextState(Opened);
      }
      client.close() = {}
    }
The complete Coco for this component is in Example_01B/src/ValveControllerImpl.coco.
Verifying your Changes (Example_1B)
All of the ports and components in this project now verify correctly.
Assuming the manually-written C++ implementation of the ValveHALBase component correctly implements its provided
port, then this means that the code generated by Popili for the ValveControllerImpl component will
compile and execute as expected, without any errors.
Step 8: Refactoring your Code
The state machine declared in the ValveControllerImpl component can be refactored to remove some of the repetitive
actions defined in the open() and close() transitions, which make calls on the ValveHALBase to move the valve each
time.
Instead of calling ValveHALBase to move the valve in these transitions in the Unknown, Opened and Closed states,
this move request can be factored out by using entry functions in the
corresponding states as follows:
  machine {
    state Initial {
      client.setup() = setNextState(Unknown)
    }

    // Valve position unknown until the first move request is received
    state Unknown {
      client.open() = setNextState(Opened)
      client.close() = setNextState(Closed)
    }

    state Opened {
      entry() = hal.move(.Open)
      client.open() = {}
      client.close() = setNextState(Closed)
    }

    state Closed {
      entry() = hal.move(.Close)
      client.open() = setNextState(Opened)
      client.close() = {}
    }
  }
Note
An entry function is defined by an expression, which is executed upon entry into a state S
in which it is declared. The expression is allowed to have a state transition function only if the target state is a
direct descendant of S, and does not cause S to be re-entered.
The complete Coco for this component is in Example_02A/src/ValveController.coco.
Step 9: Running the Generated Code
Having developed the ValveControllerImpl component, the next step is to generate the C++ code, and run it. For this, the following additional components are required:
- A hardware simulator for the valve.
- An encapsulating component that composes the components together, and specifies how they are connected to one another.
- A package file specifying code generation parameters.
- A test application.
Warning
This section is still to be completed, and currently only provides the steps for building the simulator component, and the encapsulating component.
Building a Simulator Component
The hardware simulator is a simple Coco component that implements the ValveHAL as its provided port. When called
to move, it simply sleeps for 10 seconds to simulate a blocking valve hardware that takes 10 seconds to operate.
The SimulatorImpl component is declared as follows:
import CPP
import unqualified ValveHAL

// Access to the stdlib function std::this_thread::sleep_for
@CPP.mapToValue("std::this_thread::sleep_for", .System("thread"))
external function sleep(t : Duration) : Nil = {}

@runtime(.MultiThreaded)
component SimulatorImpl {
  val client : Provided<ValveHAL>

  machine {
    client.move(_) = sleep(seconds(10))
  }
}
The function sleep(t : Duration) is an external function, and is labelled with the
@CPP.mapToValue attribute. This maps the external function to the C++ signature of
the standard library function std::this_thread::sleep_for(t : Duration), and specifies the system header file to be
included in the generated code.
The built-in Coco type Duration is automatically mapped onto the standard library type
std::chrono::duration. This means that when Coco encounters a reference to sleep(t), it will output
std::this_thread::sleep_for(t) in the corresponding generated C++.
The state machine has a single transition declared in Main:
client.move(_) = sleep(seconds(10))
When the function client.move(_) is called, it calls the function sleep(seconds(10))
defined above.
This is the entire behaviour for the simulator.
The complete Coco for this component is in Example_02A/src/SimulatorImpl.coco.
Declaring an Encapsulating Component
An encapsulating component is a component that defines a collection of components, and
specifies how they are connected together. It can have zero or more provided or required ports, but it cannot have a
state machine. It must declare instances of all the components it owns and have a constructor that
includes connector functions, specifying the connections between the encapsulating
component’s ports and those of the component instances it owns.
Note
A Coco constructor specifies how instances of components declared in the encapsulating
component are connected together. It is defined as a block expression, which
can consist of connector functions, shared access functions, and the queue control functions (with the exception of the
purge() functions), depending on the component’s type.
Declare the following encapsulating component:
import unqualified SimulatorImpl
import unqualified ValveController
import unqualified ValveControllerImpl

@runtime(.MultiThreaded)
component TestValveGroup {
  val client : Provided<ValveController>

  val valve : ValveControllerImpl
  val hal : SimulatorImpl

  init() = {
    connect(client, valve.client);
    connect(valve.hal, hal.client);
  }
}
Popili can automatically generate architecture diagrams for your encapsulating components. To achieve this:
- In VS Code, either (i) hover over your
TestValveGroupcomponent assertion in the Assertions view, and click on the View Architecture Diagram button that appears on the right of it, or (ii) click on Open Diagram in the code lens immediately above the state machine declaration in your Coco module. - In Eclipse, right-click on your
TestValveGroupcomponent declaration in the Assertions view, and select Architecture Diagram in the popup menu.
You should see the following architecture diagram for TestValveGroup:
TestValveGroup is an encapsulating component that provides one port client, and owns two component
instances, valve of type ValveControllerImpl and hal of type SimulatorImpl. The init() declaration is its
constructor, which specifies how the component instances are connected together. In this case, init()
specifies that:
- The
TestValveGroupcomponent’s own provided portclientis connected to the provided portclientof the component instancevalve. - The required port
halin component instancevalveis connected to theclientport of the component instancehal.
Note
At this point, go to Visualising Architectures to get a quick overview of the menus in the Architecture Diagram view, and experiment using the various options with your example above.
The complete Coco for this encapsulating component is in Example_02A/src/TestValveGroup.coco.